
3 green ways to remove mold in your home

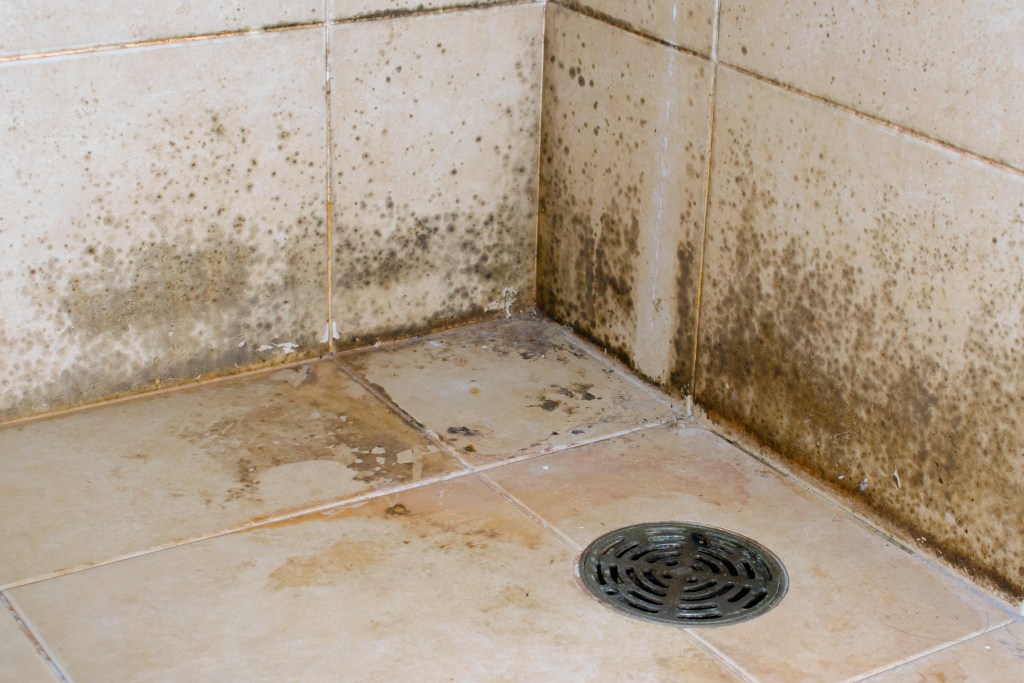
Finding mold in the home is always frustrating, whether it’s a single spot of mold growing on the wall, or an expanding mass taking over the carpet. Many people often don’t notice mold until it’s too late, and though chemicals like bleach or borax can help, some prefer solutions that are less harsh. Thankfully, there are eco-friendly ways to remove mold from your home without harming yourself or your family.

With the right ingredients, many of which are common household materials, you can kill many types of bacteria, fungus, and mold to leave your home looking squeaky clean.

Mold growing in a shower
Image used with permission by copyright holder

What are mold’s health effects?

Mold can produce allergens that can cause allergic reactions or extreme irritation. When spending a lot of time in a moldy space, you breathe in these allergens, and they can wreak havoc on your respiratory system. Inhaling spores or fragments from household mold may cause:

  • Nasal congestion
  • Wheezing
  • Chest tightness
  • Coughing and throat irritation
Recommended Videos

Moreover, prolonged exposure to mold growth and high levels of indoor dampness can reduce lung function and contribute to chronic respiratory problems such as asthma.

Vinegar can kill many mold species

Vinegar has an antimicrobial effect on fungi that can eliminate many mold species. Regular white vinegar — the type traditionally used for cooking — contains a concentration of five percent acetic acid. But to be most effective against stubborn mold, buy cleaning vinegar with a concentration of ten percent or more. You can find these types in most home improvement stores or in the cleaning aisle of your local grocery or department store.

When using vinegar against mold, pour vinegar on the moldy area and leave it for a few minutes, giving it time to work its magic. Once the mold absorbs the vinegar, use a small scrub brush to lift the mold before wiping away excess vinegar and rinsing with water. This step is crucial, as the acid in vinegar can wear away at oil-based paints, making the spot on the wall look dull and worn.

Vinegar is also an efficient household disinfectant when diluted in water (one part vinegar to ten parts of water). Spray surfaces like kitchen counters or tiles to keep them clean and prevent mold from attaching to them in the future.

Hydrogen peroxide eradicates mold

Hydrogen peroxide is eco-friendly and kills many mold species on contact. Like vinegar, the chemical makeup of hydrogen peroxide acts as a disinfectant, removing the fungus and bacteria present in mold spores. Be aware however, that mixing vinegar and hydrogen peroxide will not result in an even stronger solution. Instead, the two chemicals react to create a toxic substance.

Hydrogen peroxide works by oxidizing the spores and breaking them down. This reaction does not leave behind any toxic residues or fumes, so it’s an excellent choice for those with asthma, allergies, or other respiratory-related concerns. To use hydrogen peroxide against mold, spray it directly on the area where the mold is growing. Wait for about ten minutes when the surface stops bubbling, then wipe away the mold and excess hydrogen peroxide with a clean brush or rag.

Baking soda prevents mold growth

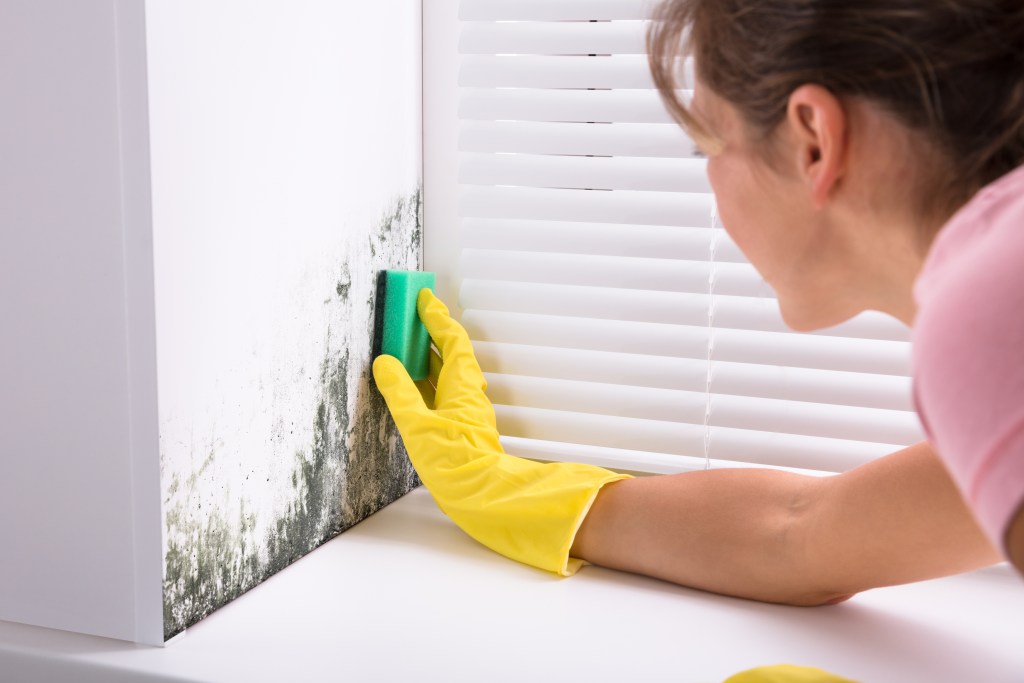
Baking soda is a fantastic alternative to commercial products that are much more severe and could harm curious kids and pets. To get rid of mold growth on most surfaces, and prevent it from returning, simply apply baking soda. Baking soda absorbs the moisture that mold species thrive on, and it’s a deodorizer so it’ll get rid of the musty stench as well.

Scrub away mold by mixing a generous amount of water and baking soda in a spray bottle. Spray the baking soda solution onto your moldy surface, then let it sit for 30 to 45 minutes. Finally, scrub it off using an old cloth or sponge and remove any excess solution from the wall with a damp rag.

Woman scrubbing mold growth
Andrey_Popov / Shutterstock

Things to remember

While all of these methods are highly effective, some work better than others when tackling specific materials or variations of mold growth. You may need to try all of these solutions at different intervals before deciding which works best for you and your home. To prevent mold from returning, keep an eye on especially damp or moist spaces in your home, like the bathroom and laundry room, and make sure you’re keeping them as clean and dry as possible.

Keep in mind that these methods work best for limited amounts of mold that exist on the surface of your walls, carpet, or tile. Unfortunately, mold can be a much more expansive, foundational problem, so if you have recurrent mold growth or notice that it exists within the walls too, call a professional for assistance.

Editors' Recommendations

Will Blesch
Former Digital Trends Contributor
Will Blesch is a copywriter, content writer, and someone passionate about anything that lets him discover more about this…
How to clean glass shower doors the right way (say goodbye to streaks)
The natural way to get a sparkling, clear shower door — without all the chemicals
Shower with a glass door

Glass shower doors add a touch of elegance to any bathroom, but they can quickly lose their sparkle because of soap scum, grime, and pesky streaks. Fear not! With the right cleaning techniques and a few simple ingredients, you can restore your glass shower door to its pristine condition. Let's explore effective methods for how to clean glass shower doors without leaving behind streaks.
What is the best thing to use to clean glass shower doors?

When it comes to cleaning glass shower doors, you have two primary options: DIY natural cleaners or commercial glass cleaners. DIY solutions are often cost-effective and environmentally friendly, while commercial cleaners may offer convenience and specialized formulas for tough stains.
White vinegar and dish soap for cutting grime
For a powerful yet natural cleaning solution, mix equal parts white vinegar and water in a spray bottle, adding a few drops of dish soap. Spray the solution onto the glass surface and let it sit for a few minutes to loosen the grime. Then, scrub gently with a sponge or microfiber cloth and rinse thoroughly with water. However, exercise caution when using vinegar on surfaces like natural stone, as it can cause damage.
Baking soda and dish soap instead of vinegar solution
If you prefer to avoid vinegar, a mixture of baking soda and dish soap can also effectively tackle grime on glass shower doors. Create a paste by mixing baking soda with a small amount of dish soap, then apply it to the glass using a sponge or cloth. Scrub gently in circular motions, focusing on areas with stubborn stains, before rinsing thoroughly.
Lemon and lemon oil to kick streaks to the curb
Harness the power of citrus to banish streaks from your glass shower doors. Simply cut a lemon in half and rub it directly onto the glass surface, focusing on areas with visible streaks. The acidic properties of the lemon help dissolve residue while leaving behind a fresh, citrusy scent. For added protection against future water marks, lightly coat the glass with lemon oil after cleaning. Your glass won't streak again for a long time!
Tips for keeping your glass shower doors clean and streak-free

Read more
How to remove stripped screws without any hassle
Unlock our best solutions for this common DIY woe
Single screw pointed up on a wood surface

Stripped screws can be a frustrating obstacle that can easily halt the progress of your DIY building or repair project. However, with the right methods and a bit of patience, you can tackle this problem effectively. Let's explore the various techniques for how to remove stripped screws, ranging from simple tricks to more advanced solutions for those severely stripped screws.
How to remove stripped screws: Initial methods to try
Here are a few simple methods to employ when the screws aren't too much of a problem.

Remove the screw with pliers
One of the simplest methods involves using a pair of pliers. Grip the head of the screw firmly with the pliers and slowly turn it counterclockwise. Apply steady pressure to prevent slipping and gradually loosen the screw from its position.
Use the rubber band method
If the screw head has enough grip left, place a rubber band over the head before inserting the screwdriver. The rubber band fills the gaps and provides extra friction, enhancing your grip on the screw. This method works particularly well for smaller screws like those on old wood furniture or screws with shallow stripping.
Try using a different screwdriver
Sometimes, the head of a stripped screw may still have one or two slots that can accommodate a different type or size of screwdriver. Experiment with various screwdrivers in your home toolkit, such as switching from a Phillips to a flathead screwdriver or adjusting the size of the screwdriver to fit the remaining slots.
Next steps: Take your removal method up a notch
Here, we have some more advanced options when the job isn't so simple.

Read more
This is how much it really costs to replace the windows in your home
From window type to material, the scope of your project will affect your window replacement costs
Man installing bottom of window trim

Replacing a window is a bigger project than many homeowners realize. With so many options to choose from, windows come in a variety of materials and styles, each affecting their overall cost. Today, we’re discussing the window replacement cost, so you can get an idea of what to expect for your next renovation.

How much does it cost to replace a single window on average?
The cost to replace a window can range from anywhere between $450 and $1500, with the average price of a window replacement costing $730, according to MarketWatch. Depending on the type of window, the material, and the location you live, window replacement prices can change based on the scope of your project.

Read more