Small home projects can make a big difference in the look of your home—and you don’t have to spend a fortune to do them. There are literally hundreds of affordable home-design improvements that you can tackle over a weekend for less than the cost of a fancy dinner for two!
There is no need to call in a professional; we’ve pulled together five of our favorite cheap home improvement ideas that anyone can DIY regardless of their skill level. These are all simple fixes, easy-to-complete, and guaranteed to have a big impact on the look of your home, both inside and out!
 Add instant curb appeal
 Add instant curb appeal
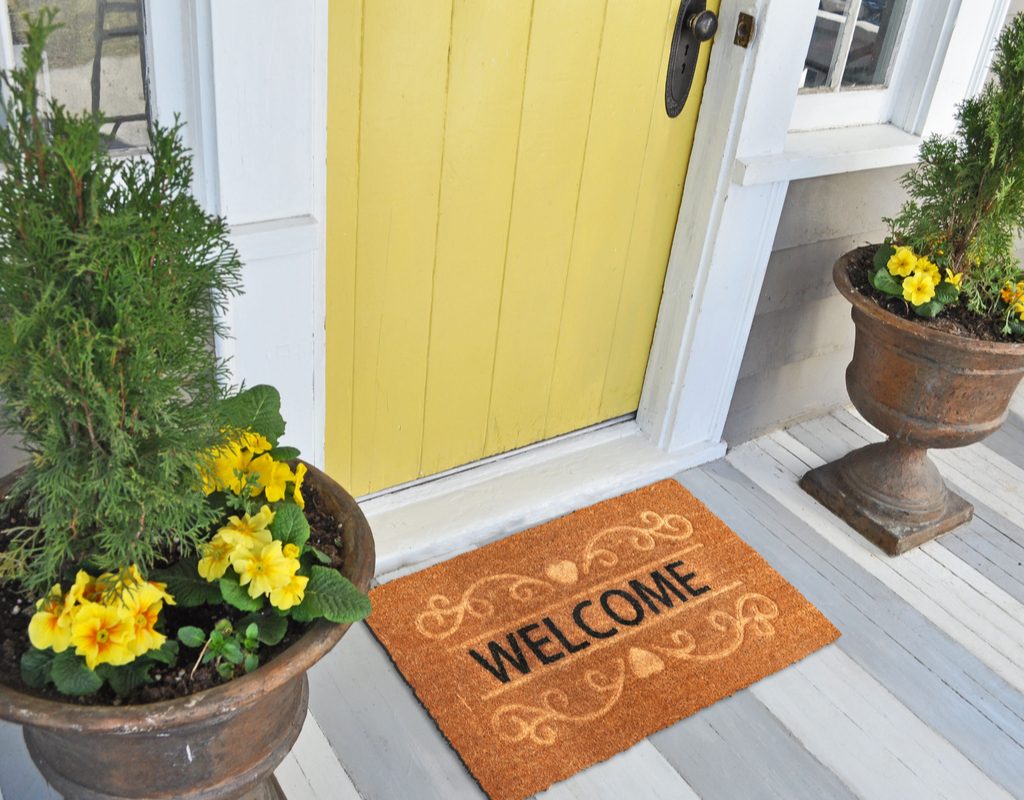
Your front entryway is the first thing anyone will notice about your home. Take a look and decide if it’s the impression you’re hoping to project. It’s so easy to change how your entryway looks, and you can do it for next to nothing—all it takes is a coat of paint and a few well-chosen accessories.
Start with color
Work with the color of your house and find a color that complements it while still standing out. If you’re looking for that “wow” impact, sunny yellow, brilliant red, or vibrant cobalt blue can make a bold statement. All you need is a can of exterior paint. We recommend a semi-gloss finish for added durability and stain resistance.
Go past the door
Take a look at your doorway mailbox and your house numbers. If they aren’t adding style to your entryway, replace them—go from brass to pewter or white to black. Replace your welcome mat with something more in keeping with your spruced-up door. Add some potted greenery or flowers on either side of your doorway. Select groupings of containers that enhance the design aesthetic, and choose a variety of sizes for maximum impact.
Reorganize your mudroom
 Reorganize your mudroom
If your mudroom has turned into a catch-all for clutter, it’s time to take back control! With good clean-up and some inexpensive mudroom shelves and storage ideas, you can transform your space into a clutter-free oasis of organization.
Tidy up
Start with a good clean-up. Toss or donate items you are no longer using and limit the number of items in your mudroom at any given time. There’s no need for snow boots taking up valuable mudroom space in July, or baseball bats and gloves in January.
Reimagine organization
If your mudroom has built-in shelving or benches, all you’ll need to do is spruce them up with some fresh paint and some new bench cushions to give the room a whole new look. You can even build your own mudroom organization system by turning stackable wooden cubes into customized furnishings, giving instant cubby storage for all of your family’s essentials.
Pick up a few bins or baskets to go inside the cubbies to keep items organized and out of sight. Install a few hooks to the wall for jackets, backpacks, baseball caps, and smaller hooks to hold keys.
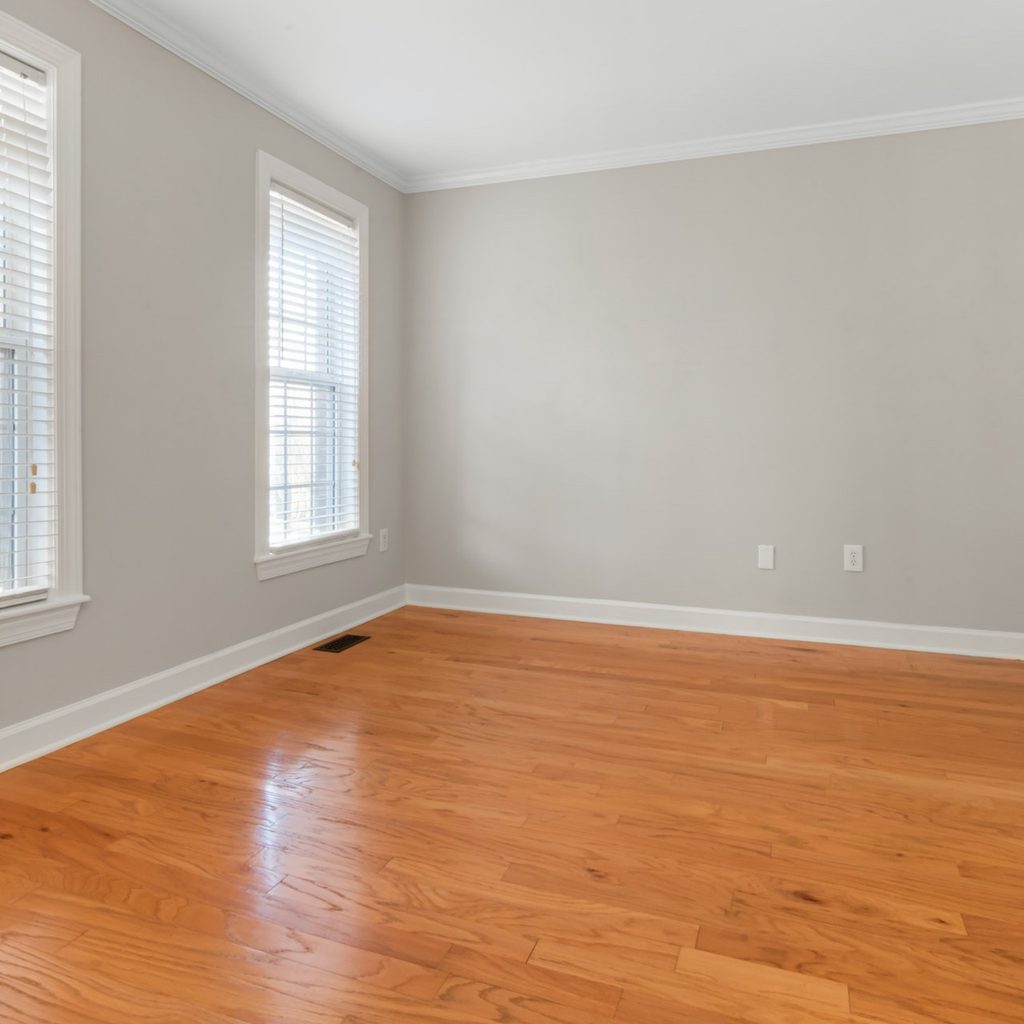
Boost the shine of your hardwood floors
 Boost the shine of your hardwood floors
It’s hard to beat the impact you’ll get by sprucing up your wood flooring. After all, dirt, dust, and everyday wear and tear can really do a number on your beautiful hardwood floors. But, it’s relatively easy to restore the luster, and the results will be quite impressive.
Do a deep clean
Move the furniture out of the room so you can get into every corner of the wood flooring. Once the room is emptied, do a thorough vacuuming or sweeping to remove as much dirt, dust, and particles as possible. If you can’t wet-mop your wood floors, invest in a good dry mop and give the floors a good scrub. You’d be surprised at how good wood floors can look with a little TLC.
Restore your floors
There are many different types and brands of wood floor restorers on the market. We recommend Buy Now . It’s an easy-to-use polymer-based floor finish with a built-in UV barrier to help protect floors from future damage. It fills in scratches, eliminates dull spots, and will bring your floor’s shine back to life. Simple to apply, you squirt it on floors, spread it around with a microfiber cloth, and let it dry for about 30 minutes. For best results, don’t replace furniture in the room for 1-2 hours.
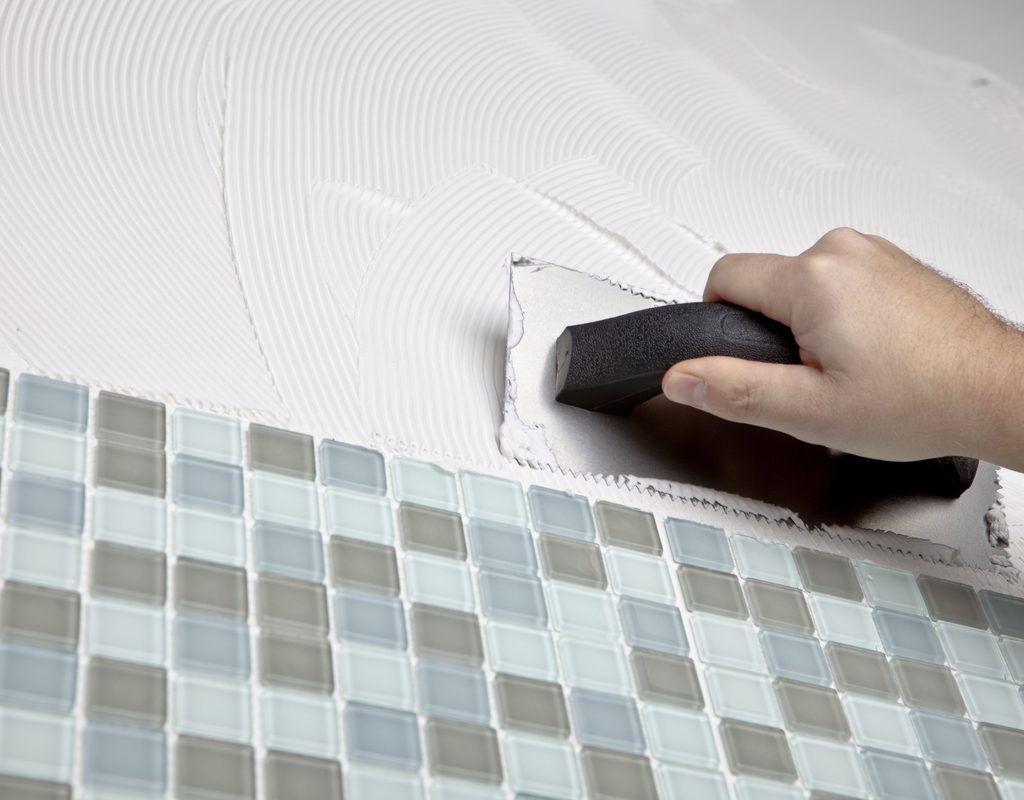
DIY a glass tile backsplash
 DIY a glass tile backsplash
Incorporate color and pattern into your bathroom or kitchen by adding a colorful glass tile backsplash. It’s easier—and more affordable—than you think!
Gather materials
Here’s what you’ll need:
- Mosaic tiles
- Box cutter
- Mastic or thin-set mortar
- Standard trowel
- Notched trowel
- Spacers
- Tile cutter or tile nipper
- Non-sanded grout
A simple how-to
- Measure: Dry fit the tiles by laying them out on a flat surface. If you only need to use part of a sheet, cut through the backing using your box cutter.
- Prep: Using a standard trowel, start from the bottom of the wall and work your way up, applying a thin, even layer of mastic or thin-set mortar. Use your notched trowel, held at a 45-degree angle, to make ridges in the mortar to help the tiles stick securely. Note: Always work in small sections so the mortar doesn’t get too dry before applying tiles.
- Install: Position and press tile sheets working up from the counter. Apply firm and even pressure with your hands to ensure a firm bond. Use plastic spacers between the tile sheet and the counter to keep spacing consistent as you press adjacent tile sheets into place. Use the tile cutter to make clean, straight cuts around outlet boxes or windows. Continue until the backsplash is covered. Once the mortar has cured for the recommended time, you’re ready to grout.
- Grout: Always use non-sanded grout for glass tiles. After mixing grout in a bucket with your putty knife, spread it evenly over your tile backsplash. Allow the grout to dry for the recommended amount of time, and then use a sponge dipped in warm water to wipe excess grout from the tile.
Paint a room
 Paint a room
Want to give a room an instant—and affordable—reboot? Grab a can of paint! If you’re looking for an affordable home improvement project you can complete in a single day, there’s no better way to make a big impact than switching up your color. Go from bland and boring to bold and vibrant, or take those warm, earthy tones you’ve had for a decade and turn your walls cool and grey.
All you’ll need is some paint tape and brushes, drop cloths, and, depending on the size of your room, a gallon or two of paint. Your biggest decision will be which color to choose, but we think that’s the fun part! Paint ceilings and moldings in crisp white to really make your new colored walls pop.
It doesn’t need to cost a fortune or take a lot of time to make a big impact on how your home looks and on how you feel about your home. We’ve shown you five different DIY projects you can do for under $150, but there are so many more ways you can give your home a little sprucing up without breaking your budget. All you need is a plan and a weekend to get things looking great for under $150!


