
You don’t have to be an expert to make these gorgeous DIY Thanksgiving wreaths

Before you welcome friends and family over for the Thanksgiving holiday, make sure your front door is visitor-ready. If you’ve always wanted to try your hand at making a holiday wreath but aren’t super crafty, you’re in luck. Wreaths aren’t too difficult to make, and creating a DIY Thanksgiving wreath can save money — some designer wreaths can run you over $100. The best part? You get to decide exactly how you want your wreath to look and take pride in knowing you did it all on your own.

As long as you have a few items at the ready like a wreath form, florist wire, wire cutter, a glue gun, scissors, pruners, and safety gear — you’ll be on your way to creating your very own Thanksgiving masterpiece. Here are a few ideas for inspiration!

Getty Images

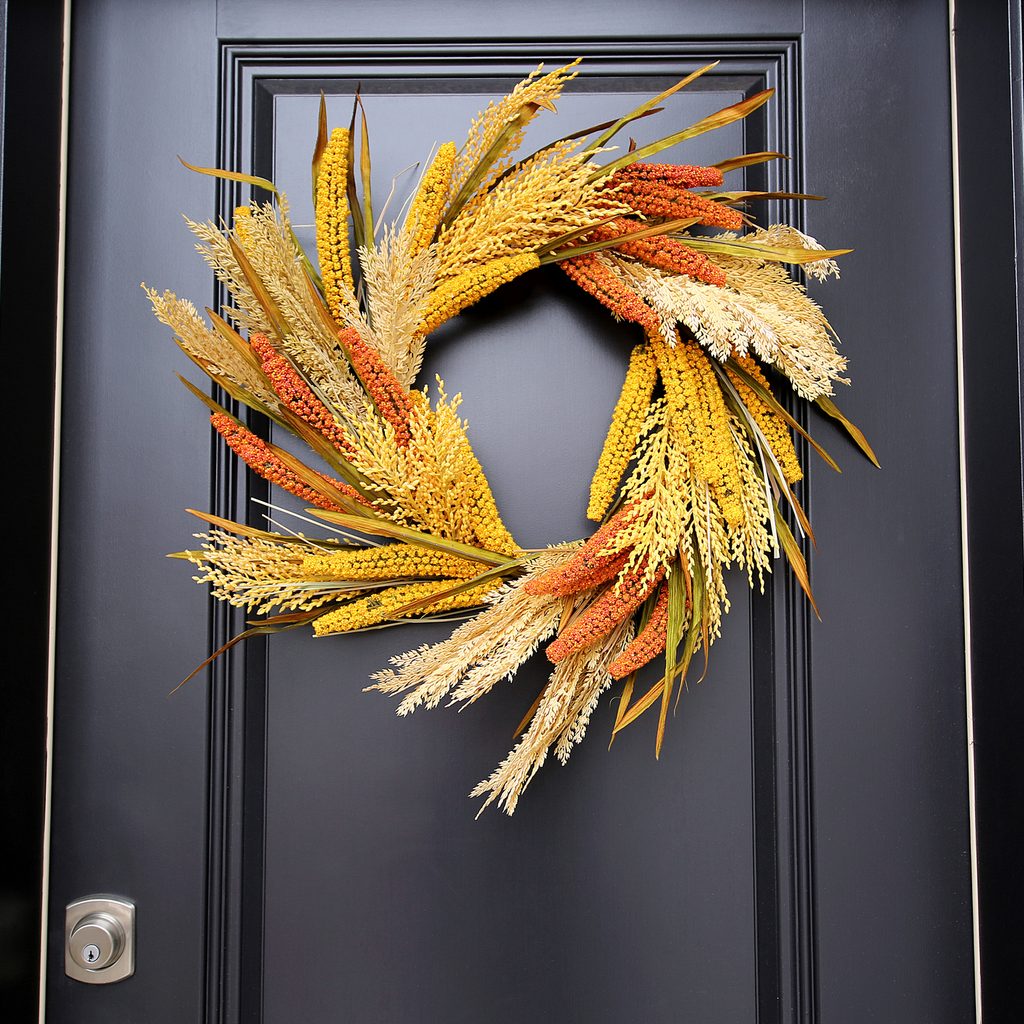
Simplicity at its finest

If you’re especially cautious about trying out a DIY wreath for the first time, start small. For this wreath, all you need is 2-7/8-inch Shaker pegs and a 12-inch craft ring. Simply adhere the shaker pegs to the wreath outline with a hot-glue gun and you have yourself a timeless wreath for your front door. You can do the same by gluing old wooden clothespins in varying sizes around the wreath form as well. If the pins are solid wood, be sure to weatherproof them beforehand.

Recommended Videos

A non-wreath wreath

You don’t always need a traditional wreath form to craft your front door’s decor. With a tobacco basket or cornucopia (sealed and weatherproofed for the outdoors) you can create a lovely adornment that’s just as festive as classic options. Using floral wire, affix seasonal flowers and leaves to the bottom half of the basket. Grab all the best icons of the season like magnolia leaves, mini pumpkins, eucalyptus, and any other colorful and textured elements you desire. Last, use a wreath hanger and secure the basket to the hanger.

If you have kids, send them on a hunt to find materials in your backyard like bark, corn husks, and other fall leaves. It can be a fun way to spend a Sunday outdoors, and it’s always great to get the little ones involved in projects around the house!

Go on a pinecone hunt

Pinecones are synonymous with the fall, so why not use the bounty nature gives you at this time of year? Pick around for pinecones of various sizes, then use floral wire to secure them to a craft ring. Feel free to layer them on top of each other until you reach the thickness you desire. To add a little pizzaz, paint the tips of the pinecones in fall colors of red, orange, and gold for an elevated decorative piece.

When decorating, remember to place the pinecones in different directions to create dimension and give texture.

Image used with permission by copyright holder

Double the trouble

If you have double front entry doors, utilize the space you have and hang matching wreaths from the top of each via a vibrant plaid ribbon. First, use a glue gun to affix the ribbon around a grapevine wreath. Then, find faux gourds, apples, or pumpkins in varying sizes and either wire or hot-glue them to the wreath (this will depend on the weight of the material). Add a little more color by incorporating leaves and other foliage, adding as many or as few as you desire, depending upon how elaborate you want your wreath to look.

You can also create opposing wreaths that use the same colors but aren’t identical. This can make for a more whimsical entryway that’s a little more fun.

These are just a few simple ways to get started on a DIY Thanksgiving wreath that will be the envy of all your neighbors and family as they enter your home this holiday. It may seem like an afterthought, but front door wreaths can set the stage for the holidays, displaying your love of the season before people even step inside.

To DIY this classic holiday decoration, all you need is your favorite seasonal elements, a little patience, and a bit of imagination to make your project come to life. While you can certainly visit a craft store for faux leaves, berries, and pumpkins, take a little time this season to celebrate the harvest and work with what nature gives you to create a stunning piece of art.

Julie Scagell
Former Digital Trends Contributor
I am a freelance writer based in Minneapolis, MN. My passions include my dogs, talking about my dogs, and taking pictures of…
8 gorgeous closet door ideas that make a stylish statement
Get some inspiration from these ideas for your next renovation
Closet with clothes and guitar in corner with plant

When redecorating your bedroom, bathroom, or hallway, you may find yourself struggling to turn your closet doors into a stylish piece in your design. Unfortunately, many closet doors appear cheap and lackluster, often becoming a visual disturbance in the space. Instead of letting your closet doors overrun your design, here are some amazing and stylish closet door ideas that are sure to help you spruce up your space.
Install antique barn doors

Everyone loves a good barn door home addition. If you’re looking for a way to spruce up your closet space, consider installing antique barn doors on a sliding rail. This is an excellent idea for small spaces because the sliding rail doesn’t require a few feet of space in front of the doors for them to swing open. Additionally, you can choose to keep the doors open for a framing effect around your closet entrance or close them for a decorative door look.

Read more
This unique wall design will make you rethink wallpaper
Wallpaper frames? An interesting concept to consider for your home
Geometric wallpaper with a console table

Wallpaper is becoming trendier in today’s home design, but some people aren’t ready to take the leap and wallpaper an entire room. This DIY project shows how you can add more visual appeal to a room using wallpaper ideas like creating individual "frames."
How to create this framed wallpaper look
@olivebranchcottage on Instagram shared a neat DIY wallpaper idea that she calls "wallpaper rectangles." This fun twist on adding traditional wallpaper to a room helps add visual appeal without being overwhelming. Here’s how she did it.

Pick your wallpaper
First, @olivebranchcottage suggests picking your wallpaper. In the nursery she designed, she opted for a black-and-white pattern depicting nature scenes.
Choose your trim
To create the "rectangles" on the wall, you’ll want to choose some wood trim. The creator chose some from The Home Depot.
Paint the trim the same color as the wall
Next, you’ll want to paint the trim the same color as the wall tone. This creates a greater sense of flow once you add the wallpaper.
Use painter’s tape to outline your design
@olivebranchcottage used painter’s tape to outline the design. This makes it easy to move pieces as needed and readjust until you find what is right for you. Also, she notes that the size and spacing of your rectangles are entirely up to personal preference. For the nursery, @olivebranchcottage placed the tape 5 inches from the ceiling and 5 inches from the baseboards.
Add your wallpaper
The creator suggests using a laser level to keep things even and straight as you place your wallpaper.
Cut your trim pieces
To cut your trim pieces, measure them to the same length as the painter’s tape you used for outlining. The Instagram creator says a 45-degree angle is best.
Use a nail gun to attach your trim pieces to the wall
Using a nail gun, attach your trim pieces to the wall. You should do this after you’ve laid your wallpaper. It’s OK if the wallpaper goes beyond the painter’s tape outline you created.
Cut the excess wallpaper
Once you attach your trim pieces to the wall, you can use an X-Acto knife to cut off the excess wallpaper. After you cut all the edges, you’ll have a stunning wallpaper design.
How to style framed wallpaper in a room
Styling the framed wallpaper is up to personal preference.

Read more
The countertop color you shouldn’t choose if you plan on ever selling your home
You need to avoid this color to market your house successfully
Kitchen with wood countertops and brick backsplash

When selling your home, you want buyers to walk in and imagine themselves living in the space. To best accomplish this sensation, many homeowners choose neutral colors to provide a blank slate. And when it comes to the kitchen countertops, this is no exception.

However, some buyers may be leaning toward a countertop color or undertone that turns many buyers away, preventing a successful sale. Today, we’re giving you everything you need to know about yellow kitchen countertops and why you shouldn’t keep them if you intend to sell your home.
Why you should avoid yellow countertops

Read more