
Have you ever wondered why the fork sits on the left and the knife on the right? Or why Europeans eat “Continental style,” holding the fork in their left hand and the knife in their right, while Americans cut, switch hands, and then eat? It turns out there’s a reason for all of it, and once you understand the history, setting the table suddenly feels far less mysterious.
Before beautifully layered place settings and Pinterest-worthy tablescapes, dining was far more practical. Medieval feasts were less about etiquette and more about survival. Plates were often shared, forks were nonexistent, and eating with your hands was the normal standard. Tables were filled with trenchers (pieces of bread used as plates), and the idea of “proper placement” simply didn’t exist.
By the mid-to-late 1800s (around 1860–1870), European dining evolved again as meals began to be served in courses. This shift introduced what became known as the Russian style of dining, where utensils were laid out intentionally and used from the outside in. The fork stayed in the left hand, the knife in the right, and the table itself began to reflect structure, rhythm, and order. This approach eventually became the “Continental style” still used across much of Europe today.
American dining took a slightly different path. Americans initially followed French etiquette, but for reasons still debated, they held onto the cut-and-switch method long after the French themselves moved on. One popular theory traces this habit back to westward expansion: settlers traveling by wagon packed light, often bringing only a fork and spoon. Another suggests knives were once seen as threatening at the table, so after cutting food, it was considered polite to set the knife down.
Whatever the reason, Americans kept switching, and here they are, generations later, still doing it. And, while both sides of the pond may disagree with how you hold your silverware, we can at least all agree how to set the table, following a standardization of etiquette.
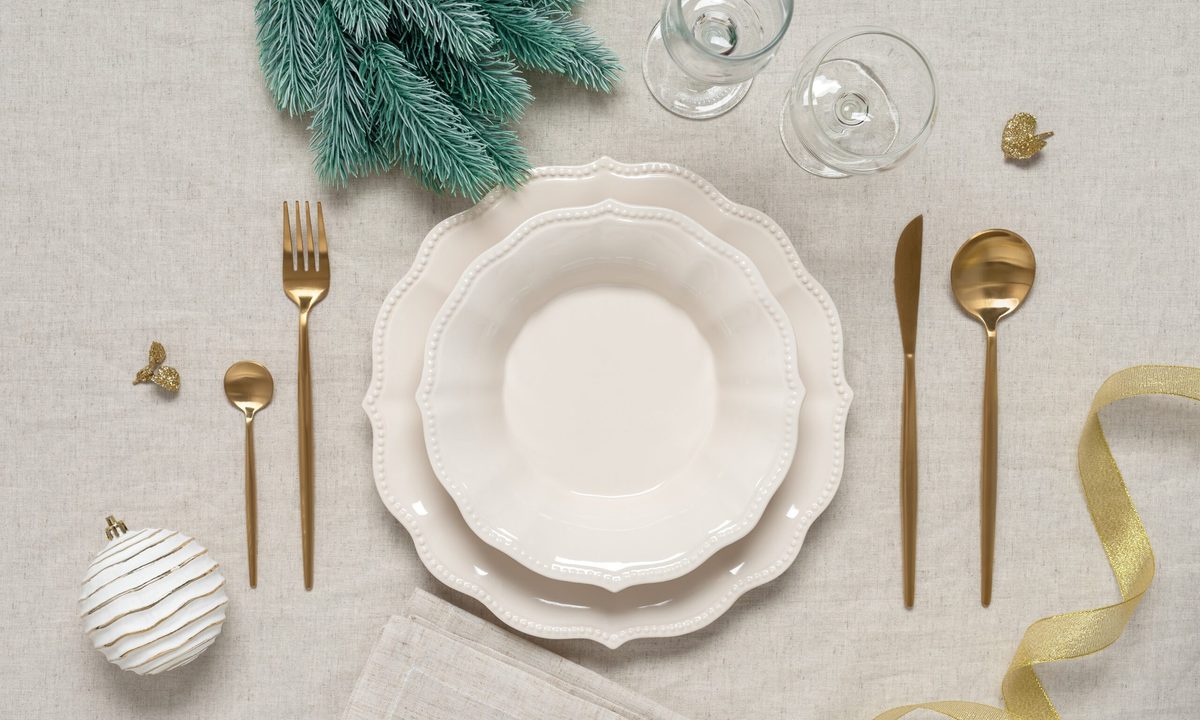
How to Set the Table (The Easy Way)
A well-set table should feel effortless, even if there’s thought behind every layer. I like to work from the bottom up, letting each piece build naturally on the last. Here’s the simplest way to do it so it looks intentional and polished:
- Placemat or Charger (optional): Center your placement or charger in front of the chair. This is your base, whether it’s stacked on top of a tablecloth, runner, or bare wood.
- Plate: Center your plate on the placemat or charger. Use a dinner plate, or stack a salad plate on top if needed. White plates create a clean canvas and let everything else shine.
- Forks: Place forks to the left of the plate. The salad or appetizer fork sits farthest from the plate, with the dinner fork closest.
- Knife: Place the knife to the right of the plate, blade facing inward.
- Spoon: Set the spoon to the right of the knife.
- Napkin: Placed the napkin either on the plate, to the left of the forks, underneath them, or tucked beneath the charger. This is where personal style comes in. Use napkin rings, ribbon, or a sprig of greenery can instantly adjust the tone of the table.
- Glassware: Place a water glass above the knife. Wine glasses, if used, sit just to the right. Keep things uncluttered. Guests should never feel like they’re navigating an obstacle course.
- Bread Plate (optional): If you add this to the table, place the bread plate above the forks, slightly to the left. You can add a small butter knife rested horizontally across the plate or it can be omitted entirely to keep things simple.
- Dessert Utensils (optional): This is also an added touch but dessert utensils are placed horizontally above the dinner plate. The dessert spoon sits with the handle facing right, and the dessert fork (if used) with the handle facing left. If dessert is casual or served away from the table, feel free to skip these and bring them out later.
The final layer is candlelight. Whether it’s tapers, votives, or something sculptural, candles add some warmth and bring the table to life. This is of course and optional touch that always adds a little drama to the experience.
That’s it. No mystery, no intimidation, just a layout refined over centuries to feel natural and balanced.
A Final Thought
At the end of the day, setting the table shouldn’t leave you worrying about perfection or following rules. It’s about creating a space that encourages people to share a meal together. A thoughtfully set table slows the pace of a meal. It invites conversation, second helpings, and the kind of moments that don’t happen when everything feels rushed or disposable. When you understand the why, the how becomes effortless and the table becomes what it was always meant to be: a place to gather, linger, and enjoy.


