
How to make Philadelphia-style ice cream

Homemade ice cream is even more decadent and delicious than the store-bought variety, but it certainly takes a lot of work. Making the custard base that’s a hallmark of “French-style” ice cream is usually the culprit behind complex and time-consuming recipes. But, there’s an easier method that, though nontraditional, elevates this timeless dessert to a whole new level. 

Philadelphia-Style Ice Cream, also known as American or New York-style ice cream, forgoes the eggs and centers the flavor of the cream, resulting in delicate and surprisingly smooth ice cream.

Image used with permission by copyright holder

What is Philadelphia-style ice cream?

During the early years of America’s history, ice cream was considered to be a European delicacy. For an American take on this dish, culinary innovators ditched the labor-intensive custard-making step in favor of a lighter ice cream that requires far less effort. They termed it Philadelphia ice cream and it’s been an All-American delicacy ever since.

Recommended Videos

Philadelphia-style ice cream is made with cream, milk, sugar, and whatever other flavorings you desire — no eggs needed. To make it, simply blend the ingredients together, churn, and freeze. It’s faster and easier, plus, its lighter, creamier texture makes it an even better style of ice cream for serving in ice cream cones.

French-style ice cream, made with a custard base, contains egg yolks that make the ice cream thicker and richer, while Philadelphia-style ice cream is lighter and airier with a more delicate texture than both French-style ice cream and Italian gelatos. 

Philadelphia ice cream recipe

A basic vanilla ice cream can be the base for so many other inventive ice cream flavors. This delicious Philadelphia ice cream takes just 30 minutes from start to finish — minus the freezing process, of course. Though delicious, this recipe isn’t made for leftovers. For best results, you should enjoy it within hours of finishing the recipe, so try not to make more than you can consume in a day or so. You can always cut the recipe in half for a smaller amount.

You will need an ice cream maker in order to make this recipe, but you don’t have to invest in a fancy gadget. Ice cream makers come in a variety of different styles and price ranges, so you can find one that fits your needs and budgets. More avid home chefs might find more utility in an expensive machine with extra features, but casual ice cream fans only need the basics.

Philadelphia-style vanilla ice cream

Ingredients:

  • 2 cups heavy cream
  • 1 cup milk
  • 3⁄4 cup sugar
  • 1 Tbs. vanilla extract

Directions:

1. Prepare

Stir the cream and milk together in a bowl. Add sugar and whisk until the sugar dissolves, about 3-4 minutes. Taste a small amount to make sure the sugar has dissolved completely and the mixture feels smooth and not grainy. Continue whisking, as needed, until you reach the desired consistency. Once you’re satisfied that all of the sugar has dissolved, stir in the vanilla extract. 

2. Chill

In a large bowl, add ice cubes to fill the bowl approximately halfway, then add enough cold water to cover the ice. Take the bowl with the cream mixture inside and nest it into the larger bowl, allowing it to cool for 30 to 45 minutes. Remove the bowl with the ice cream mixture, cover it with plastic wrap, and refrigerate for at least 3 hours but no longer than 24 hours.

Note: If you want to add anything to your basic vanilla flavor, like chocolate chips, add them now.

3. Churn

Remove the plastic wrap from the bowl and pour the chilled cream mixture into the mixing container of your ice cream maker. Freeze according to the manufacturer’s instructions.

4. Store & serve

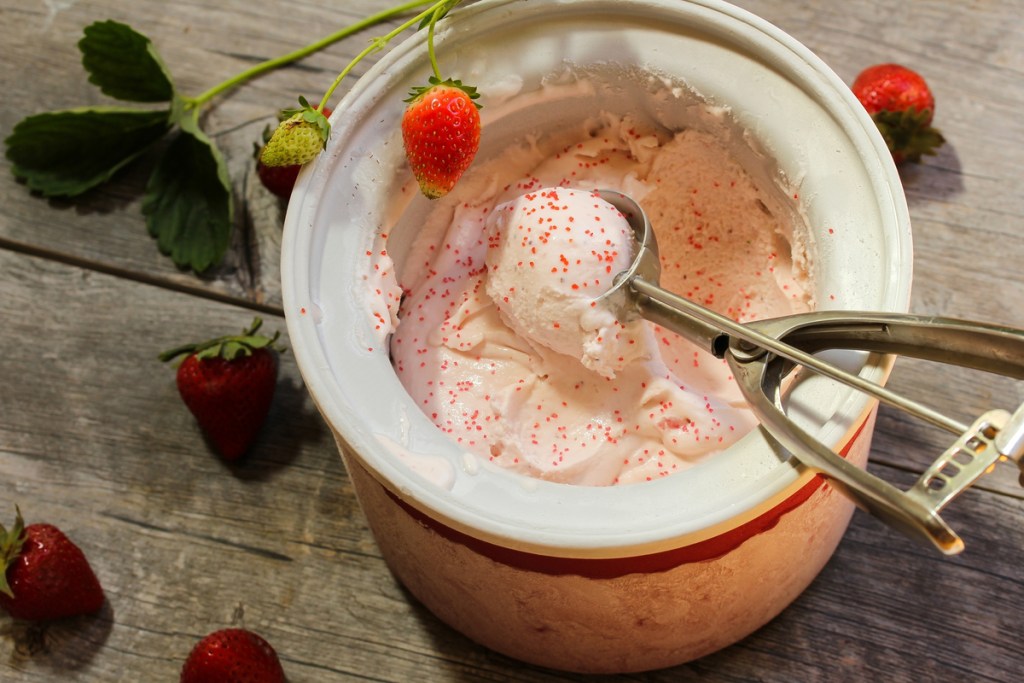
You can serve the ice cream directly from the mixing container, but it will be very soft and will have a mild flavor. Transferring the ice cream to a plastic freezer container, sealing, and freezing until firm will coax out the flavor and creamy goodness. Again, Philadelphia-style ice cream is best served within 12 hours of freezing, as it has a tendency to become grainy a day or two after churning. 

Recipe makes 1 quart. 

Once you try making Philadelphia-style ice cream at home, you’ll find it’s hard to stop. As you become more comfortable with the recipe, you can begin experimenting with different flavors like chocolate and strawberry, or you can get really creative with something like this Mind-Blowing Mint Chip ice cream! You’ll love making it, your family will love eating it, and it’s easier to do than you ever thought was possible. 

Editors' Recommendations

Kim Renta
Former Digital Trends Contributor
Kim has written for Bloomingdales, Movado, and various e-commerce wine sites. When she's not writing about wine and…
How to clean glass shower doors the right way (say goodbye to streaks)
The natural way to get a sparkling, clear shower door — without all the chemicals
Shower with a glass door

Glass shower doors add a touch of elegance to any bathroom, but they can quickly lose their sparkle because of soap scum, grime, and pesky streaks. Fear not! With the right cleaning techniques and a few simple ingredients, you can restore your glass shower door to its pristine condition. Let's explore effective methods for how to clean glass shower doors without leaving behind streaks.
What is the best thing to use to clean glass shower doors?

When it comes to cleaning glass shower doors, you have two primary options: DIY natural cleaners or commercial glass cleaners. DIY solutions are often cost-effective and environmentally friendly, while commercial cleaners may offer convenience and specialized formulas for tough stains.
White vinegar and dish soap for cutting grime
For a powerful yet natural cleaning solution, mix equal parts white vinegar and water in a spray bottle, adding a few drops of dish soap. Spray the solution onto the glass surface and let it sit for a few minutes to loosen the grime. Then, scrub gently with a sponge or microfiber cloth and rinse thoroughly with water. However, exercise caution when using vinegar on surfaces like natural stone, as it can cause damage.
Baking soda and dish soap instead of vinegar solution
If you prefer to avoid vinegar, a mixture of baking soda and dish soap can also effectively tackle grime on glass shower doors. Create a paste by mixing baking soda with a small amount of dish soap, then apply it to the glass using a sponge or cloth. Scrub gently in circular motions, focusing on areas with stubborn stains, before rinsing thoroughly.
Lemon and lemon oil to kick streaks to the curb
Harness the power of citrus to banish streaks from your glass shower doors. Simply cut a lemon in half and rub it directly onto the glass surface, focusing on areas with visible streaks. The acidic properties of the lemon help dissolve residue while leaving behind a fresh, citrusy scent. For added protection against future water marks, lightly coat the glass with lemon oil after cleaning. Your glass won't streak again for a long time!
Tips for keeping your glass shower doors clean and streak-free

Read more
How to remove stripped screws without any hassle
Unlock our best solutions for this common DIY woe
Single screw pointed up on a wood surface

Stripped screws can be a frustrating obstacle that can easily halt the progress of your DIY building or repair project. However, with the right methods and a bit of patience, you can tackle this problem effectively. Let's explore the various techniques for how to remove stripped screws, ranging from simple tricks to more advanced solutions for those severely stripped screws.
How to remove stripped screws: Initial methods to try
Here are a few simple methods to employ when the screws aren't too much of a problem.

Remove the screw with pliers
One of the simplest methods involves using a pair of pliers. Grip the head of the screw firmly with the pliers and slowly turn it counterclockwise. Apply steady pressure to prevent slipping and gradually loosen the screw from its position.
Use the rubber band method
If the screw head has enough grip left, place a rubber band over the head before inserting the screwdriver. The rubber band fills the gaps and provides extra friction, enhancing your grip on the screw. This method works particularly well for smaller screws like those on old wood furniture or screws with shallow stripping.
Try using a different screwdriver
Sometimes, the head of a stripped screw may still have one or two slots that can accommodate a different type or size of screwdriver. Experiment with various screwdrivers in your home toolkit, such as switching from a Phillips to a flathead screwdriver or adjusting the size of the screwdriver to fit the remaining slots.
Next steps: Take your removal method up a notch
Here, we have some more advanced options when the job isn't so simple.

Read more
This is how much it really costs to replace the windows in your home
From window type to material, the scope of your project will affect your window replacement costs
Man installing bottom of window trim

Replacing a window is a bigger project than many homeowners realize. With so many options to choose from, windows come in a variety of materials and styles, each affecting their overall cost. Today, we’re discussing the window replacement cost, so you can get an idea of what to expect for your next renovation.

How much does it cost to replace a single window on average?
The cost to replace a window can range from anywhere between $450 and $1500, with the average price of a window replacement costing $730, according to MarketWatch. Depending on the type of window, the material, and the location you live, window replacement prices can change based on the scope of your project.

Read more