
Clothing storage is a constant struggle for most people. Whether your entryway has piles of coats or your closet is packed with off-season outfits, you could always use more storage for your clothes. You may be happy to know you don’t have to renovate your closet to get more hanging space; you can utilize some floor space in your bedroom for a free-standing rack. Building a wooden clothing rack is a bit of a project, but it’s simple enough for even the most inexperienced DIYer who has the necessary power tools. We’ll walk you through how you can make a simple wooden clothing rack that looks sleek in your bedroom and shows off the highlights of your chic wardrobe.

How do you make a wooden hanging rack at home?
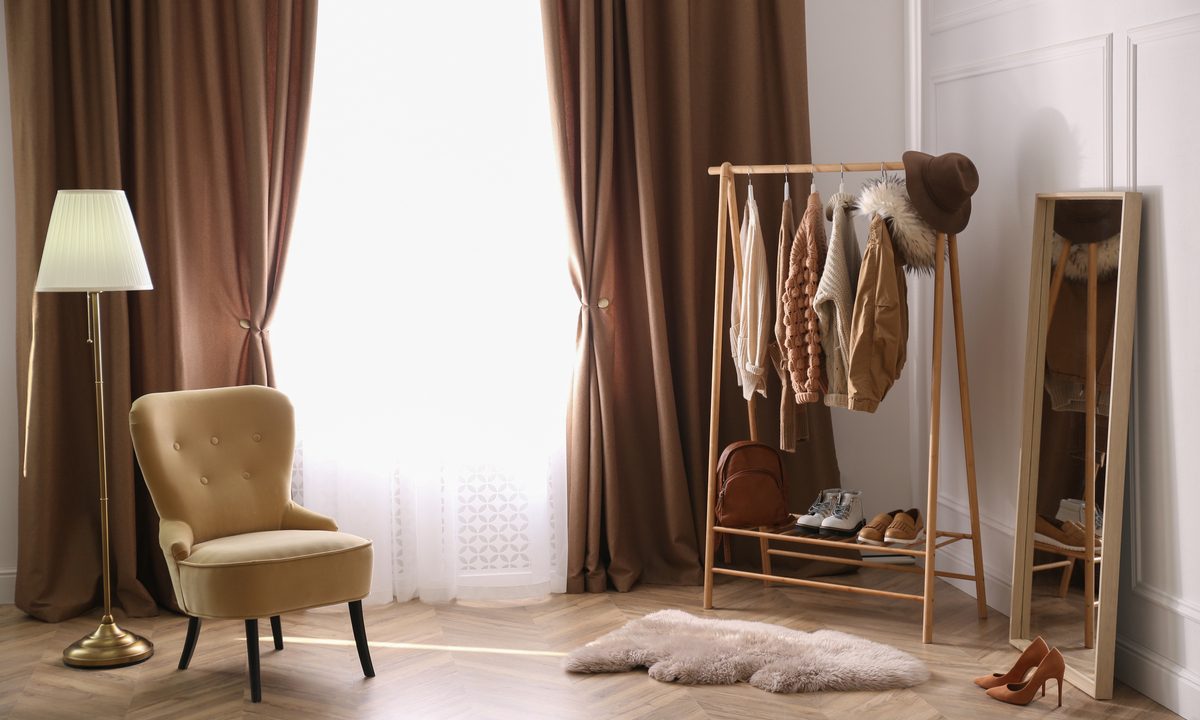
If you’re ready to take on the challenge of building your own wooden clothing rack at home, gather your materials and prepare a space big enough to work in. A good area would be a flat surface in your garage or basement. For this project, we’re going to make a simple A-frame clothing rack that will have room for several garments and a shelf along the bottom of the frame for shoes, bags, or even boxes.
Step 1: Grab four 1x2x6 lumber boards. These will serve as the four legs of the clothing rack that will form an “A” shape.
Step 2: Measure and use a pencil to mark off eight inches from both ends of each board. This is where the shelf and the rod will fall on each piece. Also, use your measuring tape to locate the exact center of each line created.
Step 3: Use an electric drill to create a pilot hole of ¼ inch on the center mark of each measurement. This is where your connection bolts will eventually go.
Step 4: Grab a miter saw and cut a corner off of the inside corner of each leg at a 10-degree angle. This will allow the legs to rest flat against the ground when tilted into the final A-frame.
Step 5: Use your miter saw again to cut four 2x2 boards down to size for the frame of your shelf at the bottom of the rack. It’s a good idea to measure them against the A-frame legs to be sure the size and shape will fit as the rack’s shelf.
Step 6: Make sure the ends of the two side pieces of the shelf frame are fitted inside the front and back pieces. Also, be sure the front piece extends 1.5 inches longer on both ends as the front legs of the rack will be secured there.
Step 7: Assemble the shelf’s frame completely with the four sides in place as they will be once they're glued. Cut down two square wooden dowels so that they fit snugly against the inside surface of the front and back of the shelf frame. These dowels will serve as a resting place for the shelf’s slats. Mark off where the ends of the square dowel fall on the inside of the front and back pieces of the shelf frame.
Step 8: Use Gorilla Glue to adhere the square dowels in place on the shelf frame. You may need to moisten the wood first before gluing, but follow the glue’s instructions for proper use.
Step 9: Secure the glued wood pieces with clamps and let them dry for 24 hours. Assemble the four legs of the rack in pairs by placing the 1x2 boards against each other so that their mitered corners are facing separate directions. Insert a connection bolt into the pilot holes you previously drilled into the top of the legs.
Step 10: Dab some Gorilla Glue on each end of the round dowel that will serve as your hanging rod and adhere the end of the rod over the inside of the pilot holes at the top of the rack’s legs.
Step 11: Use an electric drill to secure the connection bolts through each top so that it drives perpendicularly into the sides of the round dowel.
Step 12: Dab some Gorilla Glue on each end of the front and back pieces of the shelf and adhere the legs to the shelf so that the pilot holes are aligned with the end of the shelf’s front and back pieces.
Step 13: Use an electric drill to secure the connection bolts through each leg of the rack and into each end of the shelf’s glued ends.
Step 14: Measure the width of the shelf’s frame and cut several pieces of 1x2 boards to that size. These will serve as the actual shelf at the bottom of your rack.
Step 15: Dab some Gorilla Glue on the bottom ends of each wood slat at the very ends of the piece and press them face down onto the square dowels on each side of the shelf frame.
Step 16: Place a box or other heavy object onto the shelf to help the slats adhere with the glue.

Where can you use your wooden clothing rack?
Once your A-frame clothing rack is assembled and dried, you can use it in a multitude of ways. It can be set up in your bedroom for additional wardrobe space. It can also be used in your laundry room to hang clothes to dry. It’s even a great addition to a mudroom for winter coats and boots storage. Just be sure that, if wet items will be stored on the rack, you’ve sealed the wood with a water-resistant wood finish so that the wood doesn’t warp or rot.
A large walk-in closet is a coveted feature in any home. Unfortunately, not all homes come equipped with such luxury. The good news is that extra clothing storage is possible with a DIY wooden clothing rack, and you can make it with some tools and a bit of time and effort. With our guide, your extra clothes will be neatly hung and on display.


