  1. Home
  2. Inspiration
  3. How tos

My Christmas Centerpiece Method

Candle, Candlestick, Cutlery
SZemp

My personal favorite kind of table scape has always been rooted in simplicity. At my own wedding, I locked horns with the florist, wedding planner, and even my own mother-in-law, because all I wanted were floating candles and bare, yet sparkly branches. I had the vision and they just needed to trust me.

Almost ten years later, while my style has evolved, one thing has not changed: simplicity with a splash of shine always wins. I tend to lean this direction often. It’s classic and never feels overdone. 

So, how am I decorating my table for Christmas this year? I follow the same principle every December, and the method is beautifully straightforward:

  1. Pick your base.

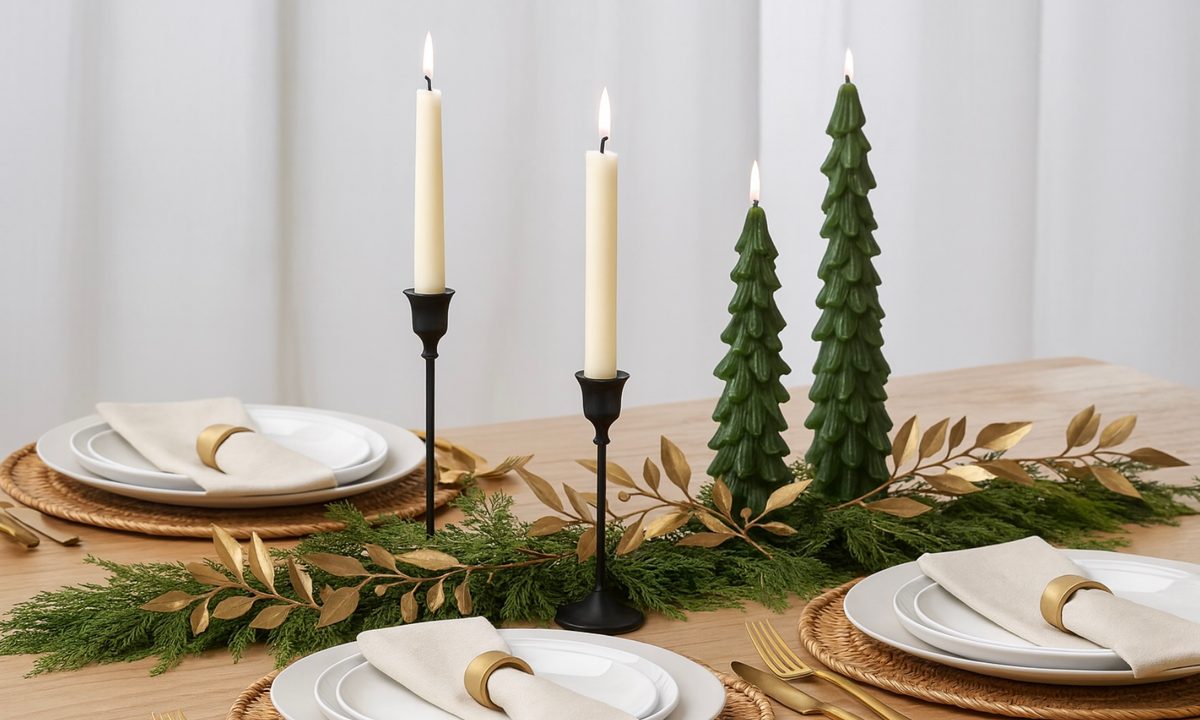
This year, I’m sticking with simple and my base will be a real cedar garland that will run along the center of the table. The fresh smell of cedar will bring a touch of the outdoors in and gently ground the space without overpowering it. Since we are just about to enter the winter season, flowers are dying down and I want my table to feel seasonally appropriate and intentional.

  1. Choose an accent

For my accent layer, I am using two brass metal garlands I picked up a few years ago from Target’s Hearth & Hand Magnolia line. While the store does not have these exact garlands this year, I have linked a few other similar options that would work great from West Elm, Pottery Barn, and Amazon. Lay them across or weave them into the cedar garland for a subtle hint of shine. This will elevate the greenery without competing with it.

  1. Fill in the gaps

Next comes the candlelight. While I still love the floating candles from my wedding (and will forever believe this look is timeless), this year, I’m using taper candles in mixed-height taper candle holders. I’ll place six along the table and, I’ll even be mixing in a few sculptural  Christmas tree candles to make it feel even more festive. While the candles themselves are all the same height (10 inches), my candles holders vary in height to give a little dimension and keep the table visually interesting.

4. Add Finishing Touches

This is where you can stop. Or, if you feel you need more, keep going. I’m keeping my centerpiece simple, but bows, additional candles, ornaments, ribbon, or small personal touches can all work beautifully. As long as it brings you joy, it belongs on the table.

5. Time to set the table.

Once your centerpiece is in place, the rest of the table practically sets itself. I always begin with chargers that echo the tone of the art I’ve created down the middle. This year, I’m choosing a neutral rattan woven placemat. It’s an easy way to keep the natural elements present while adding warmth and subtle texture. They also are structured enough to allow me to skip chargers which gave off a little too formal of a feel. 

From there, I layer upward. Simple white plates, stacked from largest to smallest, create a clean foundation. A linen napkin comes next, cinched with a brass napkin ring that ties back to the metal garland running through the centerpiece. Gold flatware frames each setting and adds just the right amount of shine.

If you’re unsure how to set your table properly (or why each piece goes where it does), you can read my breakdown here. For my final touch, I’m tucking a small sprig of cedar into each napkin ring. It is a tiny detail that feels festive without overwhelming the simplicity of the overall look. 

6. Sit back and enjoy the table. 

When each layer is chosen with intention, the whole room feels calmer, warmer, and ready for celebration. Keep it simple with a little greenery, a little shine, everything else is optional. And honestly? That’s why this method works every single year.

At the end of the day, a holiday table doesn’t need extravagance to feel magical. You also don’t need a dozen steps, a floral degree, or a giant budget. The real beauty comes from creating an inviting space where people want to linger, talk, laugh, and refill their plates. If your table feels like you, then you’ve done it right. When each layer is chosen with care, the whole room feels calmer, warmer, and ready for celebration. Keep it simple with a little greenery, a little shine, and remember that everything else is optional. And honestly? That’s why this method works every single year.

The top spring lawn care tips every homeowner needs
Get your lawn ready for the season of renewal!
Home with manicured lawn

When spring rolls around and the snow finally melts, most homeowners are eager to get outside and enjoy their yards. But before you host that backyard barbecue or stretch out with a good book in the sun, there’s work to be done. Spring lawn care is essential for reviving your grass after winter’s wear and tear and setting it up for a healthy, vibrant growing season. With a little planning and some basic lawn maintenance, you can give your lawn the fresh start it needs to thrive.
8 spring lawn care tips

Follow these eight tips to bring your lawn back to life and keep it looking lush all season long.
1. Rake leaves and debris
Even if you cleared leaves last fall, chances are new ones have blown in over the winter. Use a sturdy rake to remove any lingering leaves, twigs, thatch, and other debris. This allows sunlight and air to reach the grass and prevents fungal growth from smothering your lawn. It’s a simple step that makes a big difference.
2. Aerate the lawn if needed
If your lawn feels hard underfoot or you noticed poor drainage back in the fall, aeration might be necessary. Aerating your lawn loosens compacted soil and allows oxygen, water, and nutrients to reach the grassroots. You can rent a core aerator or hire a professional for this step — it’s typically only necessary once a year, but spring is a great time to do it if your lawn didn’t get attention in the fall.
3. Pull or treat weeds
Don’t let weeds get a head start. Spot-treat crabgrass, dandelions, and other common spring invaders before they spread. You can pull them by hand or use a weed control product, depending on your preference. If you use herbicides, be sure to choose one that’s safe for use in the spring and won’t interfere with grass seed if you plan to overseed.
4. Address diseases and pests
Keep an eye out for irregular brown spots, moldy patches, or signs of insect activity. Early spring is a good time to treat for grubs or other common lawn pests. If you’re not sure what’s causing an issue, take a sample to your local garden center — they can help you identify and treat the problem effectively.
5. Overseed for new growth
If your lawn has thin or patchy spots, overseeding is a must. Choose a grass seed mix that’s suited for your region and lawn conditions. Spread it evenly using a seed spreader, and lightly rake to ensure good seed-to-soil contact. Water the area consistently until new grass takes root, and avoid heavy foot traffic during this time.
6. Apply fertilizer
A spring feeding can give your lawn a much-needed boost. Choose a slow-release fertilizer that’s high in nitrogen to promote green, leafy growth. Make sure to follow the instructions on the label and apply it when the soil is moist — usually after watering or a good rain.
7. Water, water, water!
Spring weather can be unpredictable, so you might need to supplement with irrigation. Grass typically needs about an inch of water per week, whether from rainfall or a sprinkler system. Water deeply and less frequently to encourage deeper root growth, which helps your lawn stay resilient during dry spells.
8. Establish a mowing and watering schedule
Once your lawn is growing steadily, get into the habit of mowing regularly — usually once a week, depending on the growth rate. Never cut more than one-third of the grass blade at a time, and keep your mower blades sharp. Set a consistent watering schedule that complements local weather patterns to keep your grass hydrated without overdoing it.
What do you need for spring lawn care?

Read more
Keep your oak kitchen cabinets fresh and modern with these tips
Transform your outdated oak kitchen cabinets for a luxe, modern design
Modern kitchen with red oak cabinets and white countertops

Oak kitchen cabinets are a staple in many traditional homes. Their earthy tones and elegant appearance have placed them at the top of the ladder, making them one of the most beloved cabinet materials in recent decades. While this wood has stood the test of time in interior design, keeping an oak-heavy kitchen from looking out of place in a redesigned home can be challenging. Oak cabinetry often caters to traditional decor, making it hard to implement these gorgeous tones and textures into a more modern or contemporary space.

If you’re a modern enthusiast who wants to maintain the traditional oak cabinet look without creating a tacky design, then we have the tips for you. Here’s how to dress up your kitchen to balance modernity with traditional oak cabinets.
How to make oak kitchen cabinets look modern and contemporary

Read more
How to plant flowers in 6 steps for a gorgeous garden
Bring some life and vibrance to your outdoor space
Tulips in a border flower bed

Flowers lift the spirit. They can brighten your home from within a vase or they can add splashes of color around your yard. Either way, vibrant flowers add beauty, color, and charm wherever they are. Whether you're ready to plant the best perennial blooms that you can enjoy for years to come, or you're looking for annual flowers that will bloom for a single season, you’ve come to the right place.

Read more