
21OAK may earn a commission when you buy through links on our site.

How to deep-clean your grill for winter storage

For some extreme barbecuers, grilling season never ends. There are always people willing to stand outside in a parka jacket and dodge snowdrifts just to whip up a perfectly grilled steak. For the rest of us who switch to countertop grills during the winter months, the end of the fall means it’s time to put those outdoor grills into storage until next year.

Cleaning and winterizing your grill ensures that it’s going to be fully functional and ready to go when grilling season rolls around once again. After you’ve grilled your last bratwurst, check out this guide to learn how to clean and store your grill the right way.

Image used with permission by copyright holder

How to clean your grill

Sadly it isn’t as simple as just turning off your grill, shutting the lid, and walking away. To prevent the grill from rusting or accumulating too much food debris and grease, it’s important to clean and prepare your grill for seasons of unuse. These easy-to-follow steps will work with any type of grill — gas, propane, or charcoal. 

Recommended Videos

Fire cleansing

After your final cookout of the season, preheat your grill one last time to heat up the grids. 

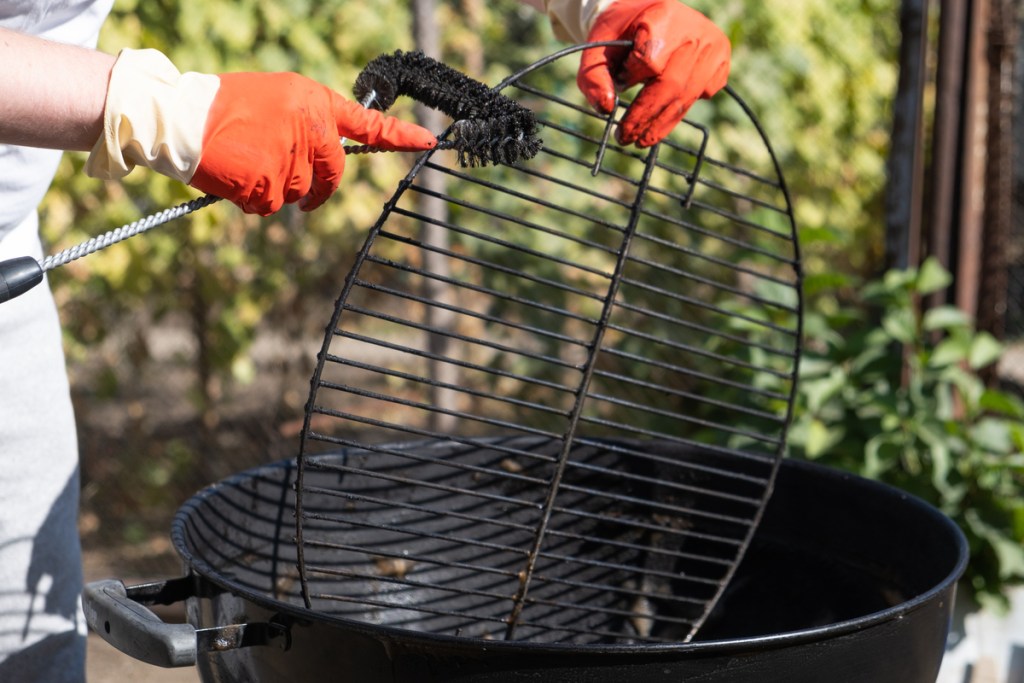
Once warm, grab your grill brush and scrub the grids to loosen as much dried-on food and debris as possible. Clearing away all traces of leftover food and BBQ sauces can prevent curious critters from getting inside as they’re looking for a snack. If you live in an area with temperatures that don’t drop below freezing during the winter, mold can also take hold of any leftover food on the grill.

If you don’t have a grill brush, it’s crucial to invest in one, not just for the pre-winter cleaning process, but for everyday maintenance as well. If you clean the grids after every use, the burnt-on, sticky food won’t get a chance to really build up. This makes the end-of-season cleaning much easier and more efficient. We recommend this highly-rated, bristle-free option that you can get on Amazon for less than $20.

Time to scrub

Fire and heat will take care of some of the burnt-on food debris, but not all of it. Let the grill cool down, then remove the grids, tamers, and burners. Use a 3M pad, dish soap, and water to scrub the remaining residue from the entire interior of the grill.

Be sure to rinse thoroughly so you don’t leave any soapy residue behind. Empty out your drip pans and ash catchers, then scrub and rinse them as well before replacing them in their original spots. 

Appearances matter

Don’t neglect the outside of your grill when you are completing your winterizing regimen. Though it doesn’t come into contact with food, it’s an important step in keeping your grill looking clean and sanitary. Use a damp, soapy cloth to wipe down the outside of the grill, removing any sticky sauces, drippings, and splatters. Avoid using abrasive cleaners on the outside of your grill as they can corrode the metal or stainless steel coating.

Image used with permission by copyright holder

Cover, protect, and store

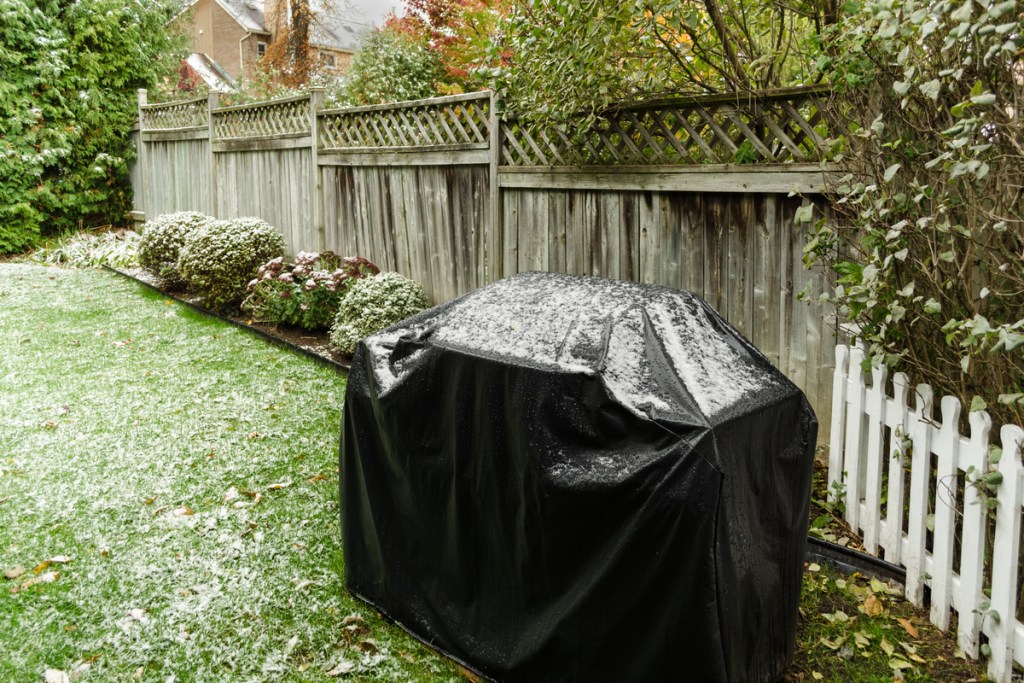
To protect your valuable grill from the punishing effects of harsh winter weather, invest in a high-quality weatherproof cover. Grill covers can keep it safe from the corroding wintry elements and greatly extend the life of your grill. Be sure your grill is completely dry before covering it up, as lingering moisture can lead to rust. Quickly inspect the cover once it’s in place, checking for any rips or holes. Bugs, rodents, and moisture can get into even the tiniest tears, so if you can’t patch it properly, it may be time to buy a new grill cover. 

If possible, store your grill in the garage or shed for the winter season. If you don’t have an appropriate enclosed space, try to find a place in your yard that has an overhang to minimize snow or rain exposure, or at least a spot where it will be somewhat protected from gusts of high winds. 

Note: never store propane tanks inside, not even in a garage. 

Winterizing your grill will take a little time and effort, but it will be well worth it when spring rolls around and you can wheel it out to start grilling without having to first scrape off food, grease, and dried sauces that have been sitting on the grids for months. Make grill winterizing a part of your annual fall clean-up schedule and you’ll be the grill master of your backyard cookouts for years to come. 

Editors' Recommendations

Kim Renta
Former Digital Trends Contributor
Kim has written for Bloomingdales, Movado, and various e-commerce wine sites. When she's not writing about wine and…
Avoid a huge fire risk in your home: How to clean your dryer vent
Use these tips and tricks for a safer, more effective dryer
Outside dryer vent

A clean home can cultivate peace and kick stress to the curb, but it can be difficult to keep up with those often-neglected areas of the home. The laundry room is one of those areas, but it's also a space that's downright dangerous to neglect. In fact, FEMA reported that clothes dryers cause around 2,900 fires in residential buildings every year, resulting in widespread damage, serious injury, and even death.

However, you can prevent catastrophe in your home by cleaning your dryer regularly. If you don't know where to start, don't worry. We’ll walk you through how to clean the dryer vent so your laundry room and your home will be both clean and safe.
What you need
Before you begin, gather these items:

Read more
Sick of cloudy glasses? This is the cleaning hack you need
Say goodbye to cloudy glasses with this simple item you probably have in your kitchen
Water glasses upside down on a rack

Dishwashers are a godsend for busy families, saving you from the elbow grease needed to clean a sink full of dishes with a scrubbing brush or sponge. But the downfall of these machines is pulling your supposedly clean drinking glasses out of the dishwasher only to find them cloudy and dull. It's a common frustration that many households face, but fear not, there's a simple solution to cloudy glasses that's been making waves on social media.

Enter the cloudy glasses Instagram hack -- a viral cleaning trick that promises to banish cloudy residue and leave your glasses sparkling clear. Let's dive into what causes cloudy glasses, the Instagram that's taken the internet by storm, and other methods to keep your drinking glasses gleaming.
What does it mean when glasses are cloudy?

Read more
How to clean glass shower doors the right way (say goodbye to streaks)
The natural way to get a sparkling, clear shower door — without all the chemicals
Shower with a glass door

Glass shower doors add a touch of elegance to any bathroom, but they can quickly lose their sparkle because of soap scum, grime, and pesky streaks. Fear not! With the right cleaning techniques and a few simple ingredients, you can restore your glass shower door to its pristine condition. Let's explore effective methods for how to clean glass shower doors without leaving behind streaks.
What is the best thing to use to clean glass shower doors?

When it comes to cleaning glass shower doors, you have two primary options: DIY natural cleaners or commercial glass cleaners. DIY solutions are often cost-effective and environmentally friendly, while commercial cleaners may offer convenience and specialized formulas for tough stains.
White vinegar and dish soap for cutting grime
For a powerful yet natural cleaning solution, mix equal parts white vinegar and water in a spray bottle, adding a few drops of dish soap. Spray the solution onto the glass surface and let it sit for a few minutes to loosen the grime. Then, scrub gently with a sponge or microfiber cloth and rinse thoroughly with water. However, exercise caution when using vinegar on surfaces like natural stone, as it can cause damage.
Baking soda and dish soap instead of vinegar solution
If you prefer to avoid vinegar, a mixture of baking soda and dish soap can also effectively tackle grime on glass shower doors. Create a paste by mixing baking soda with a small amount of dish soap, then apply it to the glass using a sponge or cloth. Scrub gently in circular motions, focusing on areas with stubborn stains, before rinsing thoroughly.
Lemon and lemon oil to kick streaks to the curb
Harness the power of citrus to banish streaks from your glass shower doors. Simply cut a lemon in half and rub it directly onto the glass surface, focusing on areas with visible streaks. The acidic properties of the lemon help dissolve residue while leaving behind a fresh, citrusy scent. For added protection against future water marks, lightly coat the glass with lemon oil after cleaning. Your glass won't streak again for a long time!
Tips for keeping your glass shower doors clean and streak-free

Read more