
21OAK may earn a commission when you buy through links on our site.

I tried this over-the-sink dish rack from Amazon and fell in love

Image used with permission by copyright holder

When it comes to the kitchen, I love buying utensils, pots and pans, small appliances, and pretty much everything cooking-related. The problem with my slight obsession with all things kitchen is that I often run out of places to put all of the stuff I have. Ultimately, I end up buying organizational items to keep all of my tools and gadgets in order. So, when I found this over the sink dish rack on Amazon, I had to have it. Since I usually buy first and figure out usefulness later, I wasn’t sure how much I would end up using it at first. However, once I set it up over my sink, I fell in love and wondered how I lived without it.

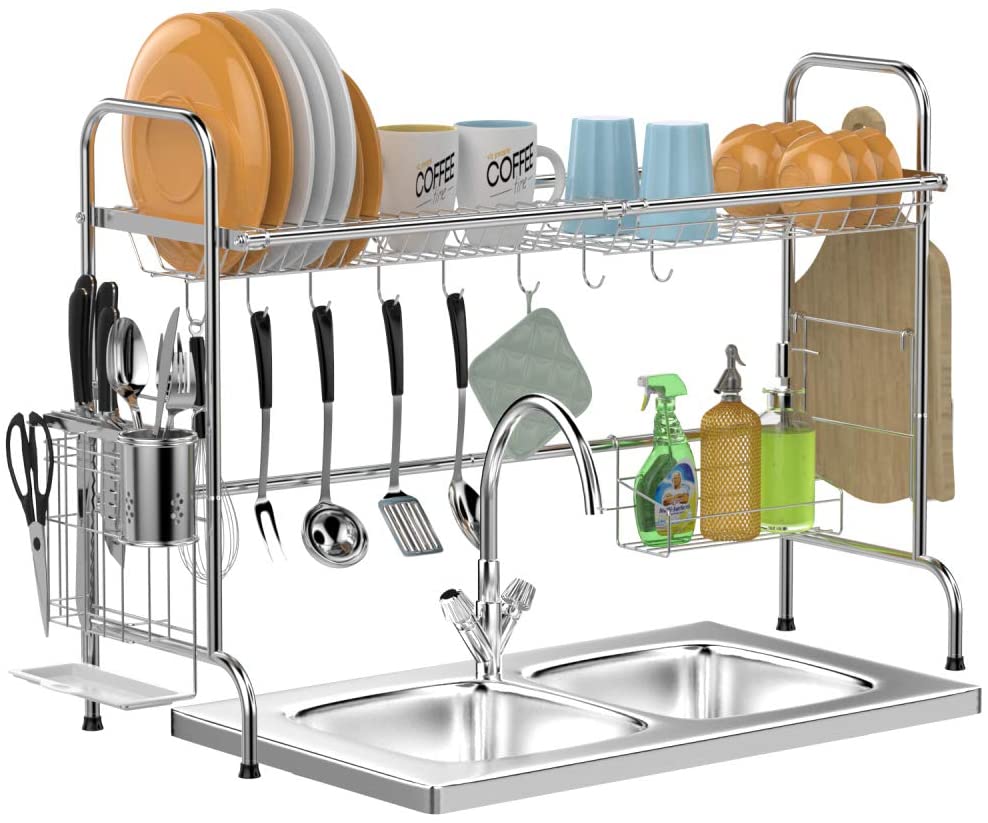
The dimensions of the rack are 35 inches by 9.8 inches by 24.5 inches, (it will fit on any sink 35 inches or smaller), so be sure to measure your sink before buying. The rack is made of stainless steel, so it is ultra-durable and can hold up to 28 pounds. It has feet that help to distribute the top weight evenly and are nonslip, so the rack stays put.

Recommended Videos

The best part about this over-the-sink dish rack is that it is so much more than a dish rack. It is a space-saving storage space for all of the utensils and items you use regularly. The rack comes with a removable utensil holder, hooks for pots and pans, potholders, or whatever else you want to hang, and a cutting board holder. The rack makes organization simple and keeps your most-used items at your fingertips. Obviously, there is also a rack on top for drying dishes that have just been washed. I use the top rack for drying large pots and pans or containers that I hand wash rather than put in the dishwasher. There is also a handy shelf for dish soap and sponges.

This rack is particularly useful for people with limited counter space but can be used in any kitchen. It helps you get extra items off the counter and organized neatly, and it creates valuable space above your sink, usually an area in the kitchen that is underutilized. Also, any drips of water from the drying dishes just fall into the sink, so there are no puddles of water to deal with. Ultimately, this over-the-sink dish rack is a must-have.

Editors' Recommendations

Kelly Kaliszewski
Kelly's work has appeared in blogs and on websites. When she's not writing, she is playing with her two dogs, cooking, or…
How to clean mold from your kitchen and bathroom
clean mold from kitchen and bathroom how to

Everyone knows that mold is gross, and it can cause a variety of health issues when people inhale the spores. But mold can be both cleaned and prevented if you follow the right steps and understand how it forms and multiplies.
There are about 100,000 different types of mold in the world, and 12 of them exist in household settings, says Apartment Guide. Of these 12 types, two are common in the kitchen and bathroom areas, where there exists a lot of moisture and condensation. These two types are what we are discussing today: How to identify them, clean them, and prevent them from recurring.

Kitchen and bathroom mold identification
The most common mold in homes is ulocladium. It lives in kitchens, bathrooms, and where there is water damage in basements and on windows. It forms in household areas with high condensation, such as steamy bathrooms with inadequate ventilation, or kitchens that experience high volumes of steam and moisture.
This mold isn’t as harmful as some others, but it can cause hay fever, trouble breathing, skin irritations and infections, and asthma symptoms in people who are sensitive to it.
The second most-common mold found in residential homes is alternaria, says The National Library of Medicine. Unlike ulocladium, this mold appears when water damage has occurred, such as when shower water has breached tile grout or a kitchen sink has leaked into drywall. This mold spreads quickly and can cause asthma symptoms in people who are sensitive to it.

Read more
This is how much it really costs to replace the windows in your home
From window type to material, the scope of your project will affect your window replacement costs
Man installing bottom of window trim

Replacing a window is a bigger project than many homeowners realize. With so many options to choose from, windows come in a variety of materials and styles, each affecting their overall cost. Today, we’re discussing the window replacement cost, so you can get an idea of what to expect for your next renovation.

How much does it cost to replace a single window on average?
The cost to replace a window can range from anywhere between $450 and $1500, with the average price of a window replacement costing $730, according to MarketWatch. Depending on the type of window, the material, and the location you live, window replacement prices can change based on the scope of your project.

Read more
How to remove stripped screws without any hassle
Unlock our best solutions for this common DIY woe
Single screw pointed up on a wood surface

Stripped screws can be a frustrating obstacle that can easily halt the progress of your DIY building or repair project. However, with the right methods and a bit of patience, you can tackle this problem effectively. Let's explore the various techniques for how to remove stripped screws, ranging from simple tricks to more advanced solutions for those severely stripped screws.
How to remove stripped screws: Initial methods to try
Here are a few simple methods to employ when the screws aren't too much of a problem.

Remove the screw with pliers
One of the simplest methods involves using a pair of pliers. Grip the head of the screw firmly with the pliers and slowly turn it counterclockwise. Apply steady pressure to prevent slipping and gradually loosen the screw from its position.
Use the rubber band method
If the screw head has enough grip left, place a rubber band over the head before inserting the screwdriver. The rubber band fills the gaps and provides extra friction, enhancing your grip on the screw. This method works particularly well for smaller screws like those on old wood furniture or screws with shallow stripping.
Try using a different screwdriver
Sometimes, the head of a stripped screw may still have one or two slots that can accommodate a different type or size of screwdriver. Experiment with various screwdrivers in your home toolkit, such as switching from a Phillips to a flathead screwdriver or adjusting the size of the screwdriver to fit the remaining slots.
Next steps: Take your removal method up a notch
Here, we have some more advanced options when the job isn't so simple.

Read more